Friday, October 31, 2008

Brownie - Chocolate Basic

My very 1st attempt in baking... Brownies! Almost every Friday, the kids & I will head over to greenhoihoi's place for play, chit chat & tea time snack. Usually it's greenhoihoi who will provide something for tea eg. muffins, custards / bought cookies. This time I made the effort & time to bake something for us & kids to enjoy our tea time.
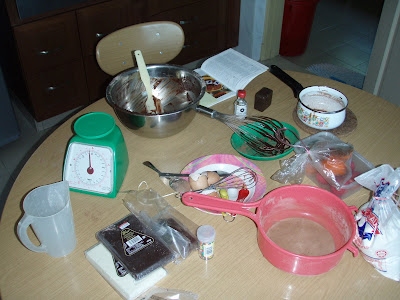
Can see how untidy I was while whipping everything together ;)
Taa-dah! Final product.. smells great just out of the oven
I searched high & low for my MIL's baking paper/ grease proof paper and just could not find it! So I improvised by greasing the baking tin with lots of butter. Didn't help much I guess, you can obviously see bits stuck to the tin :p

Kids & I having some fun dusting caster sugar on top & sprinkling hearts over it.


I did the Brownies from this book called "Brownies, Fudges & Toppings" family circle mini cookbooks (pg 14 & 15). It was a gift from Popes when I started my SAHM tour of duty in Jan'08. Am ashame to admit it.. but I've only just got inspired to try the recipes out (it's now Oct'08). Oh well! as the saying goes ~ 'Better late than never'
Ingredients:
150g butter ~ chopped
125g dark chocolate ~ chopped
3 eggs
1.5 cups (375g) caster sugar
1 tsp vanilla essense
1 cup (125g) plain flour
1/4 cup (30g) cocoa powder
icing sugar ~ to dust
Method:
1. Preheat oven to 180'C (350'F/Gas 4). Brush a 20cm (8 inch) square cake tin with oil or melted butter. Line the base with baking paper, extending over 2 sides.
2. Melt the butter & chocolate in a heatproof bowl, over a pan of simmering water, stirring occassionally. Remove from heat & allow to cool slightly.
3. Use a wire whisk to beat the eggs, sugar, & vanilla essense together in a large bowl until well combined. Sift the flour & cocoa together. Whisk the chocolate mixture into the egg mixture & stir in the sifted flour & cocoa; do not overbeat.
4. Pour into the prepared tin. Bake for 40 minutes, until slightly risen & just firm to the touch. Leave to cool in the tin (it will sink back down to form a flat surface) then lift out & cut into squares when completely cold.
Dust icing sugar to serve.

Friday, October 24, 2008

Custard Friday


Today the kids & I had a nice treat of warm custard prepared by greenhoihoi :) Thank you very much for the lovely tea time we had today.
Hope you'll post the recipe up for us ;)


Wednesday, October 22, 2008

Disappointment #6 ~ Peppercorn Chicken ~

I got inspired by http://www.mykitchensnippets.com/2008/10/spicy-szechuan-peppercorns-chicken.html

Her's looked and probably tasted much better. My chicken pieces don't look as evenly brown or crispy as her's. I didn't know where to find Szechuan Peppercorns.. so I just used whatever type of Peppercorns that was in my MIL's kitchen.

Think I failed the frying technique / skill with this dish. Somehow my version turned out to look like Kong Po Chicken instead ~ only less dark.


Saturday, October 18, 2008

Chow Faan a.k.a. Fried Rice

The most common dish around, Chow Faan (cantonese) a.k.a. Fried Rice / Nasi Goreng (malay). Had so much left over rice from over a week, left over fried fishes here & there, a few sausages, crab stick, frozen peas, few strands of long beans etc. Think you get the picture. So much left overs here & there, had little choice but to cook Fried Rice for dinner.

Ingredients : Left over rice, sauages, crabstick, deboned fried fish meat, chopped carrots, frozen peas, chopped long beans, chopped garlic, & 4 eggs.


Little Chef's handy helper couldn't resist beating the eggs
The final product. Served with chilli, tomato ketchup if you like.

Thursday, October 9, 2008

Nasi Lemak

I haven't had a chance to try it out myself just yet. But here are some simple recipes from our very own Malaysians. This is for the benefit of my dear frens living abroad & craving some good old Nasi Lemak :)

http://www.norlia.com/recipe_nasi_lemak_english.htm

http://www.malaysianfood.net/recipes/recipenasilemak.htm

http://allrecipes.com/Recipe/Malaysian-Nasi-Lemak/Detail.aspx

Tuesday, October 7, 2008

Pan Mee Homemade Style

Forgive the poor photography... was starving & trying to snap a shot of it ;)

This is my MIL's homemade recipe. The normal Pan Mee available at the hawker stalls usually flatten their noodle dough with a little noodle make machine. It's either flat like Fettuccine or round & slim like Spaghetti. Ours at home is just pinched & flatten with our fingers ~ hence, homemade.

To make the dough, just use normal wheat flour (tepung gandum) about 1 kg can make enough for 10 large bowls of noodles.

Sieve the flour into a large round & flat stainless steel pan, add 1 egg & mix it. Then slowly pour in salted water into the dough. It shouldn't be too wet. So just slowly add as much salted water until all dry flour becomes a sticky dough. Then you'll have to knead it like making bread.

Boy! Speak about inexperience : it took me 40mins to actually knead the dough into shape. It was tiring! Sorry, my hands are not that strong :p

Leave the dough to sort of soften / expand.

Our soup base is made of anchiovies (ikan billis). Then we used already sauteed mushrooms which were previously steamed. Sliced them to desired bite size pieces. Pork slices were marinated with L&P sauce, Xiao Shing Wine, Dark Soya Sauce & Light Soya Sauce ~ stir fried with chopped garlic.

Start pinching & flattening out your Pan Mee dough into bite size pieces. Don't allow it to be too thick as it'll be uncooked in the middle. Throw them into your pot of Anchiovie Soup Base together with some Choi Sum (or any favourite veg) and let it come to boil. When your Pan Mee pieces start to float.

Dish your desired amount of Pan Mee & Choi Sum into bowl & add sliced mushrooms & pork slices. Garnish with fried shallots. :)


Wednesday, October 1, 2008

Pork Ribs Special

This is a slight variation from the Pork Ribs in Special Sauce per "Dinner for 6" blog


Ingredients:
600g Pork Ribs


Marinade:
1 Egg White
Sprikles of Masterfoods All Purpose Seasoning
1 Tbsp Xiao Shing Wine
1 Tsp Sesame Oil

Sauce:
3 Tbsp Tomato Ketchup
1 Tbsp Xiao Shing Wine
2 Tbsp Lee Perrins Sauce
2 Tbsp Teriyaki Marinade Sauce
1 Tsp Dark/Sweet Soya Sauce


Method:
1. Wash pork ribs and add in the marinade. Refrigerate for at least 2 hours or longer.
2. Heat your frying pan with just enough oil for deep frying. I personally prefer to use a non-stick for this. Keep the flames at medium heat. Once the oil is hot enough, start to deep fry your pork ribs. Put them aside.
3. Remove the access oil from frying pan. Pour in your sauce mix & heat it up. Taste it to your liking ie salty enough or not. Then add the fried pork ribs & just stir it into the sauce.
Ready to be served. ~ this seems to be a favourite base on feedback of Inlaws :p

Mushroom Chicken Tau Fu

Wasn't sure what to do with the tau fu (beancurd) initially. Then I thought, why not cook it with minced chicken & dried shitake mushrooms. Didn't really have a recipe to follow but did get an inspiration from Popes Minced Pork with Potatoes dish which I had for lunch last week.

Ingredients
1 Large White Tau Fu
4 Large Shitake (pre-sauteed/cooked with light soya sauce, sesame oil & dash of pepper) ~ sliced
400g Minced Chicken (can always substitute with Beef or Pork)
1 Tbsp Garlic ~ chopped

Marinade
1 Tbsp Dark Soya Sauce
1 Tbsp Light Soya Sauce
1 Tbsp Corn Flour
Dash of Pepper

Seasoning
2 Tbsp Oyster Sauce
1/2 - 1 Cup of Water
2 Tbsp Corn Flour diluted in water
2 Tsp Dark Soya Sauce

Method
1. Cut Tau Fu into bite size pieces, coat it with egg yolk/together with egg white & a little bit of flour.
2. Fry Tau Fu in oil till golden in colour. Put aside.
3. Marinade the Mince Chicken & keep refridgerated for at least 2 hours.
4. Heat wok with oil, fry chopped garlic & minced chicken with sliced mushrooms. Add the water & let it boil a bit. Then add the prefried Tau Fu & the rest of the seasoning. Add a little bit more water if it becomes too dry. Let it cook a while for the flavours to be absorbed into the Tau Fu.

Serve with Rice.